¶ Dealing with the Swarm
The Thargon Swarm is a major component of AX combat and knowing how to deal with it is important to fight interceptors effectively. There are two main methods in this regard; using the remote release flak launcher to destroy the swarm, and flying flakless while avoiding the swarm entirely. While both methods have their pros and cons, it is advisable to learn how to use the flak launcher when starting out. As you gain experience, you may decide if flak, flakless, or a mix of both is right for you. This article contains several methods to deal with the swarm, but to fully grasp them it is advisable to learn the full mechanics and behavior of the swarm first.
Visit the Thargon Swarms page to learn about it’s functions and mechanics in detail.
¶ Techniques & Counters
This is a list of general methods and tips about relevant mechanics to handle the swarm. These can be used in a variety of scenarios by both beginners and advanced AX pilots.
¶ The Reverski
Reversing directly away from the interceptor is known as the “reverski”. It is a safe and reliable maneuver to kite interceptors and their swarms. It allows pilots to focus on destroying the swarm with flak, or beaming down the shield when flying flakless.
To initiate a reverski:
-
Turn FA-Off, transfer pips to ENG if needed, and boost in a straight line directly away from the interceptor.
The goal here is to gain more than 3km of distance from the interceptor, which will put you outside of it’s main cannon range.
Keep boosting until you are at the maximum range you can be without the Interceptor losing interest. (Typically around 6km, but can be even closer) -
Once at a comfortable distance, flip your ship 180° and face in the opposite direction of your movement vector.
You should now be moving in a straight line backwards while still facing the interceptor, this is the ‘reverski’ part.
Be sure not to accidentally thrust forward and cancel your backwards momentum, which would allow the interceptor to quickly catch you. -
You can now fire your flak and/or beam(s) or safely repair hull and modules.
Keep an eye on the distance to the interceptor, remember that allowing it to close to 3km puts you in danger of its main cannon.
The interceptor will also make an audible droning noise when closing into cannon range. -
If the interceptor begins to get too close, you may need to repeat steps 1-2.
Alternatively, you might consider a “boost pass” to gain range instead
- Several AX Guides will demonstrate this technique
¶ Boost Pass / Switching Interceptor & Swarm Position
In some cases the swarm will stay behind the Interceptor, making it difficult to engage safely. Also, if the player’s boost speed is slower than the interceptor’s top speed, boost passing may be necessary to create distance from the interceptor. Both situations commonly happen with the Basilisk, which is faster than other interceptor types and it’s own swarm.
To boost pass, engage silent runnning (or drop a heatsink if shielded), then boost towards but not directly at the interceptor. Ideally, you will pass close by without colliding with the interceptor or being struck by it’s lightning attack. The interceptor’s inertia will cause it to drift away and take a long time to return, while the swarm will make a much sharper turn to follow your boost. Depending on the initial conditions, multiple boost passes may be necessary to gain the desired range, or swap the positions of the swarm and interceptor. Silent running may be disengaged once outside of the 3km cannon range.
¶ Missile Baiting
An effective way to avoid the swarm’s missile strike and reset the swarm to the standard state. Strong situational awareness is advised when employing this technique, as you have a limited amount of time to identify a safe vector after agitating the swarm.
- Gain more than 3km range from the swarm
- Enter Reverski, allow it to catch up slowly (missile formation moves at around 360m/s when near firing range) and once it is within 3km the missiles will begin to fire.
- Maintain distance of 2.5 - 2.9km, reversing at around 300m/s - the missiles will expire before reaching you.
- Follow this up with a boost through the swarm after it reverts to a non-missile formation to reset it’s state.
Mind that accidently going beyond 3km range mid-missile barrage will interrupt it! Slowly enter within 3km range again and let the missile barrage finish before you boost through the swarm!
- Demo: Missile Baiting
¶ Swarm Rerolling
You can use the interceptors recalling behavior to your advantage to reroll the current swarm formation into a different, maybe more desirable, one. This is usually done to avoid needing to flak the difficult ring formation used by Medusa and Hydra swarms.
- Move to a medium distance (depending on ship 4-6km) and stay cold via silent running or heatsinks, do not beam the Interceptor.
- After about 5 seconds the Interceptor should lose track of you and recall the swarm in preperation to leave.
The recall will cause the swarm to break formation. Wait until you see the swarm enter retreat mode, then gain back the attention of the interceptor by exiting silent-running, heating up or beaming it. - Depending on initial distance and relative speed between you and the interceptor, multiple recall reroll attempts may be done while in reverski.
- Make sure you act fast - you do not want the interceptor to leave the instance by waking out!
After you regain the interceptor’s attention the swarm will change into a regular formation again. It can roll the same as the previous one, but with any luck you will have rolled a new formation! Note that this ‘recall’ reroll is not possible in Legacy.
Another method to reroll swarms that works in both Live and Legacy servers is to purposefully fly through the swarm, as each time forces a formation reroll. This can safely be done during the grace period where the swarm will not agitate 30 seconds after deployment.
- Demo: Swarm Rerolling
¶ Destroying the Swarm
The only effective weapon against the Swarm is the remote release Flak Launcher. All techniques to destroy the Swarm require this weapon to be fitted.
¶ How to use the Flak Launcher
The remote release Flak Launcher only comes in the class 2 hardpoint size. Choose the fixed variant.
- Make sure you are not using the Festive Flak Launcher! it will appear as a pre-engineered flak launcher with a decorative color blueprint. Similarly, do not use the remote release flechette launcher, as that is not an AX weapon and has a completely different use.

Set your ship’s targeting sights to Leading in the right systems panel when using flak.
Nightvision can also be very helpful when observing the swarm under dark conditions.
It may also help beginners to equip a xeno scanner when learning how to flak in order to be able to see the exact count of the thargon swarm and thus see how effective each individual flak shot is, but that is optional. The flak launcher is an unusual weapon, and the swarm is a tricky target, so some practice is required to gain proficiency in using it.
-
After firing the weapon, continue holding down your firing trigger, and then release it to detonate the fired round.
-
While traveling the flak round will have a visual targeting indicator made up of a circle and 3 triangle corners.
-
As the flak round aproaches targets in its blast radius, the circle will fill with color in a clockwise direction. There is also a rising beeping audio cue.
-
Once the circle is filled completely, the triangle will flash red and the audio cue will turn into a high pitch, indicating there is something in the flak round’s blast radius.
Detonating the flak at this point will destroy any thargons in it’s blast radius. Depending on the relative closing speed between the swarm and flak projectile, this “release window” may only be a fraction of a second. You will need to adjust your release timing based on distance, closing speeds, and your own reaction time.
Your leading sights indicator will generally provide you with information to estimate where the swarm is heading and where you should fire your flak projectile. Try to predict changes in the swarms’ trajectory when leading your shots.
¶ Medium Range flakking
When you are within ~ 3.5 kilometer range of the swarm it will move in an oscillating pattern while attempting to get closer and fire upon you. During this, the swarm will have peaks and valleys in its swaying motion before changing direction. The thargons change of direction is an ideal window of opportunity to hit them, as they will spend the most time at that position.
To hit the flak more consistently you want to fire your flak to where you predict the swarms sway will be peaking. This will differ based on your range and angle.
An easy rule of thumb for beginners is aiming about halfway ~ or two thirds of the way between the center of the swarm and the leading sights indicator just after the swarm changed direction.
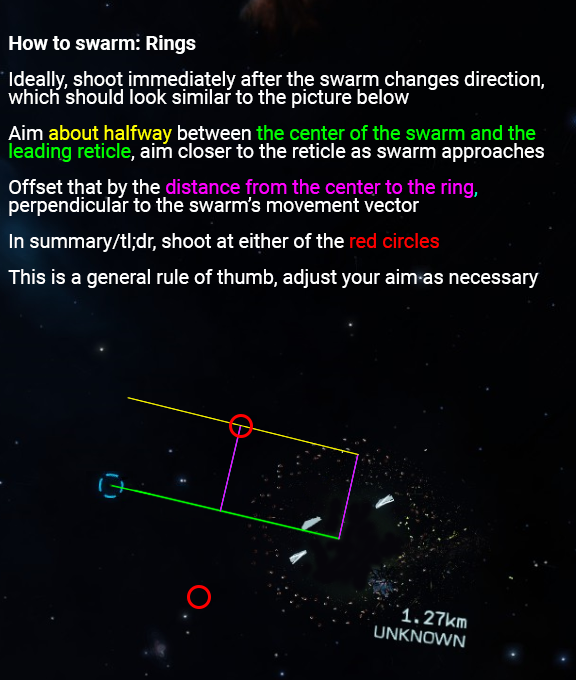
¶ Ring flakking
Rings are a swarm formation first used by the Medusa interceptor and very common with both it and the Hydra. It is more difficult to hit flak on, because of the hollow area in the center, flak shots need to be aimed and predicted off-center to hit the outer rim of the ring reliably. Also, due to the less densely packed nature of the formation, rings will always require more flak shots to destroy than other formations.
A good trick for beginners is offsetting your aim by the radius of the ring and then imagining columns or lines that are aligned parallel to the direction of movement the swarm currently has. Predicting your shot along these lines, similarly to the rule of thumb mentioned above, will increase your hitrate on the thargons positioned on the outer ring rather than empty space.
- Demo: Ring Flakking
¶ Painbeavering
A more advanced technique. Not recommended for less experienced AX pilots. Involves agitating the swarm on purpose and then chasing it down while it attempts to retreat to 2km in order to enter missile formation.
This comes with some risk as you are often in range of the interceptor’s main cannon, and failure can mean you end up with an agitated swarm while locked in a lightning attack.
This technique however does reward you with an extremely easy to hit, densely packed swarm that can destroy even a Hydra swarm in 5 flak rounds.
- Fly through the swarm with some speed so they do not stay and ‘hover’ around your ship.
- The swarm will break formation and enter its clustered “idle / retreat” mode, while attempting to gain a 2km distance from you in order for it to switch to missile mode.
- Flip your ship and chase the swarm while it is in retreat, taking care you don’t get farther than 2km away.
- Fire your flak at the straightlining swarm while you keep chasing it.
Consider the swarms movement away from you as you trigger the flak - hold a bit longer than you are used to before release, to ensure the shrapnel hits as many thargons as possible.
It is one of the few ways in that slow ships (notably the ‘Vette, but also the ‘Conda and FGS) can effectively deal with the swarm.
But it can also be employed by faster ships to deal with the swarm quickly and effectively.
Named after CMDR Painbeaver.
-
Demo: The Painbeaver, medium ship
Note that a shield-ram is not necessary to use this technique to get rid of a swarm - but it is often paired with it by experienced commanders to accelerate a fight.
¶ Flakless Flying
A swarm can be kept in the standard state for the entire duration of the fight, simply by never agitating the swarm. This means that agile ships can avoid using flak altogether.
The low accuracy of the swarm’s caustic projectiles against shieldless targets combined with the lack of thargon missiles eliminates a large portion of the threat that the swarm presents.
If the swarm at any point enters an agitated state, one can bait the missiles before boosting through the swarm, reverting it back to the Standard state.
¶ Flakless Orbit
This does require a fair bit of situational awareness and orbital finesse, as pilots must adjust their orbit around the interceptor to prevent agitations. Watch your radar contacts closely.
The guiding principal of flakless orbit is that we orient the travel path of our orbit, so that we move away from the swarm and do not intersect it, while firing on the Interceptor.
¶ Orientation
The main vector in a traditional orbit is downwards. The easiest way to manage the swarms position is to orient your ship to keep the swarm above you as you orbit. The swarm will try to follow you, but not catch up and not intersect with you, if you keep this up correctly.
Use roll to adjust your orientation - you want the swarm to stay at the top (or above) of your screen while orbiting.
(Take care not to over-roll, you can risk stalling as your former vector will work against your current thrust direction if they flip.)
¶ Insert
When inserting into an Orbit with the swarm present, it is good to have a mapped out idea of the path your ship will be taking along the Interceptor and by the present swarm without intersecting it.
One of the easiest and safest methods is to do a clean insert from distance by beginning in reverski;
- Take note of the swarms and interceptors position
- Orient your ship like described previously, swarm above
- Give downwards thrust to build a vector of movement
- Slow down and let the Interceptor slowly catch up to you
- Use a little roll to ensure the swarm does not intersect as you aproach, keep it at the top / side of your screen
- Choose a side, left or right, from the interceptor and commit to it (if you have a preference for your side-thrust, plan accordingly)
- Keep the swarm above / to the side of you, as you turn your ship and swing into the orbit while facing the Interceptor
- You do not want to swing past, ensure you adjust your vector speed accordingly and do not overspeed. Use forward thrust to maintain and close range proactively, backward to loosen it.
Take proactive control of your orbit and where you want your enemy to be, and you will be taking charge of the fight.
If you are at risk of intersecting with the swarm, it is fine to abandon the insert, or an attack-run that has not progressed far yet. Boost away and then reaproach.
Flying without flak allows a CMDR to fit other weaponry. Generally either a beam to speed up shield phases, or another AX weapon to help with exerts and hearts.