¶ “Goid Opal Mining”
Basilisk farming, commonly referred to as ”Goid Opal Mining,” is one of the best methods to get credits solo in Elite Dangerous. It requires a bespoke ship, some unlocks, and a bit of practice to make it work.
The payout expected is around 250 mill/hr for a beginner and upwards of 450 mill/hr if you are an expert, with each Basilisk paying 24 million credits. The main advantages to this are that it can be done at any time solo (not reliant on events or other people), and once you have built the ship it needs zero setup (unlike exobiology that requires finding a good spot in the black) and has a very consistent and high payout.
Also, learning to farm Basilisks can be gratifying as
it is easy enough to perform a basic stun-lock but can be refined to an art form, which earns you even more money.
¶ Ship Builds
This is a highly specialised task, and as such requires a specialised ship.
¶ Modshards
If you are already familiar with modified shard cannons and their differences in acquisition from regular tech broker shards, skip this section.
The bread and butter of stun-locking a Basilisk is the ”Modified Shard Cannon” or ”Modshard” for short. These are pre-engineered medium (or small) shard cannons that are exclusively available for purchase for materials in the permit-locked Mbooni system.
The Mbooni permit is acquired by first allying your commander with the ”Azimuth
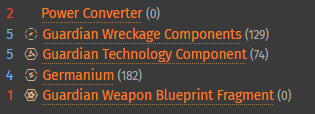
Biotech” in game faction which is done through trade profit or exploration data. Each modshard requires its own set of materials and cargo to purchase; the requirements are below.
For help finding an Azimuth Biotech controlled station please use Inara and for help gathering materials use this link.
¶ Ship Build Theory
A good stun-locking ship needs to have four things:
- The ability to mount at least five medium modshards
- A distributor large enough to make good use of them
- Sufficient hull and module reinforcement to survive the fight
- Good enough convergence for reliable damage output
The obvious best choice is the Anaconda. The Anaconda can be very lightly engineered and still be the best ship for the job due to the sublime convergence it has for a large ship, and its C8 distributor. This is contrary to regular AX since speed is not important for stun-locking; in regular AX the Anaconda is bad.
Many other ships have varying degrees of viability. The Corsair and Federal Gunship are both top of the line stun-locking ships, whereas the Python Mk II or the Federal Corvette, while still useable, have notable drawbacks in the small distributor on the Python or terrible convergence on the Corvette.
This guide has three recommended builds that will be evaluated below, but other ships can also be used for this process. Please be aware that without an intimate familiarity with stun-locking methodology and theory, throwing together your own build can make the kill harder, and sometimes even impossible.
If you are an AX beginner please try one of the recommended builds or speak to an expert before theory crafting your own.
¶ Recommended Builds
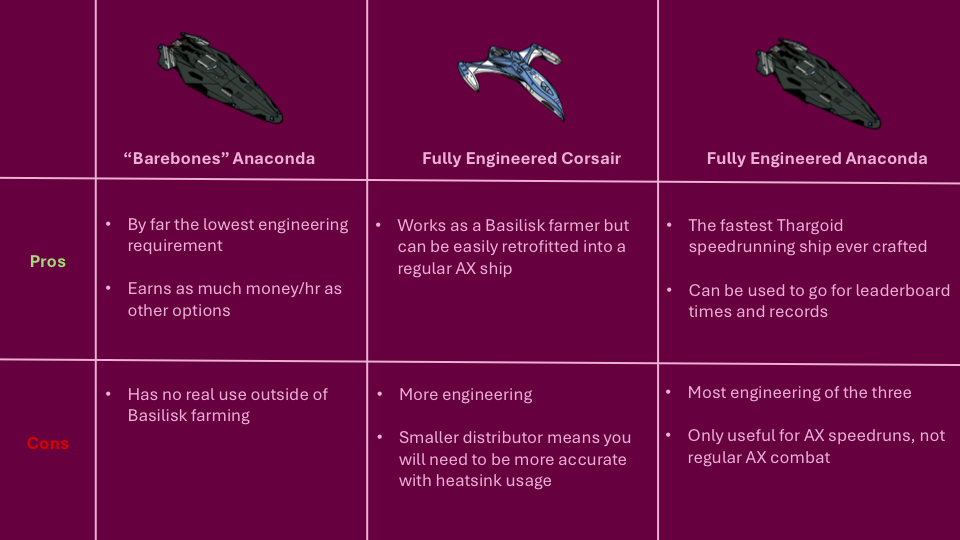
The three builds recommended by this guide are the Bare-bones Anaconda, the Fully Engineered Corsair, and the Fully Engineered Anaconda (Click for EDSY link). The graphic below outlines the pros and cons of each, but if you have no interest in other AX content or setting a leaderboard-worthy speedrun the best option is the Bare-bones Anaconda.
¶ Premium Ammo
If you understand signal source looping you will already be aware that using this method of moneymaking means that your Basilisk farming ship never needs to re-arm. Therefore if you were to synth premium ammunition for your shards it would never disappear even if you changed ship. You might be tempted to do this immediately because ”more damage = better” but actually, too much damage in a short period of time (particularly if a heart is exerted or has just been destroyed) can cause the Thargoid to ”panic shield”.
Because of this, it is the recommendation of this guide that you, when you gather materials for modshards, collect enough materials for 6 premium guardian shard syntheses but do NOT load them onto your ship until you are confident enough to get the kill every single time.
¶ The basics of locking and looping
Where and how to find your Goid Opal Mining hotspots efficiently!
¶ Signal Source Looping
If you are already familiar with signal source looping and the 5 minute reset time, skip this section.
The crux of the humble Basilisk farm is the ability to loop the same signal source while having your ship returned to the state it was before entering, but KEEPING the 24 million credit bond. If done properly, you will re-launch the game with full ammo and no damage taken.
This is done by simply dropping in, killing the Basilisk, and then task-killing the game (via Task Manager) before Five Minutes have passed since you dropped into the instance. It is unlikely for you to run out of time as a Basilisk fight takes around 2 minutes total and stun-locking ships typically burn out before five minutes of fighting; you are more likely to die than run out of time. Once you have task killed and relaunched the game, jump to supercruise and the signal you just left should be within around 20 Mm of you.
Please be aware that signal sources near a station will shift as the station orbits the star, and may make identifying the signal you were previously at difficult.
¶ Locating Signal Sources
Thargoid signal sources can be found in the four local nebulae of the galaxy. The closest and best one is the Pleiades Nebula. It is recommended to farm in Sterope II and Asterope, jumping from one to another when the Basilisk signal sources dry up.
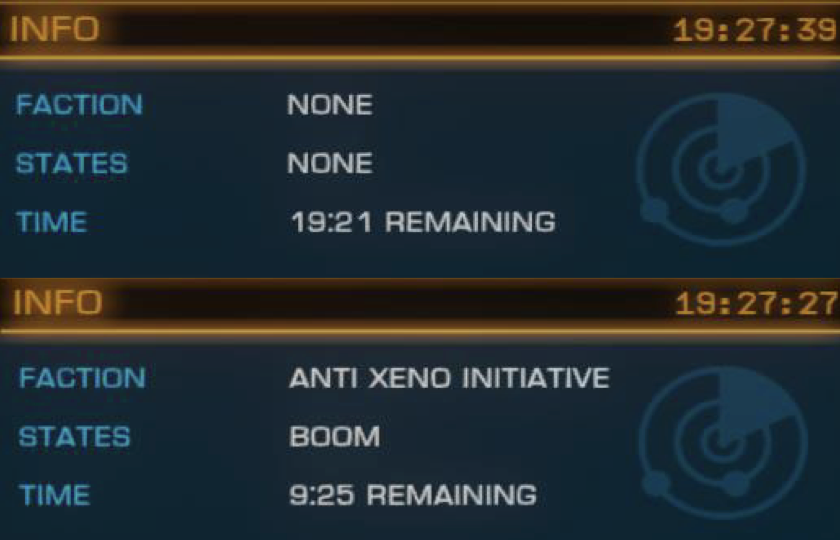
But how do you know which signals contain a Basilisk? Easy, ”Threat 6” signal sources with a faction listed on the top right of the screen are potential Basilisk spawns, and if the faction is listed as ”none” then the signal often contains Scouts. These signals with a listed faction can be empty, but they are the signals you want to be looping. The below image shows the difference between a Scout signal and a Basilisk signal.
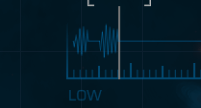
To easily identify these signals, use the FSS scanner, but tune it to the far right of the ”blob” associated with non-human signal sources. Any signal properly scanned with this method will have a faction associated with it and will not be scouts. A visual description of the trick is below.
¶ Introduction to Thargoid Mechanics
If you are already familiar with the basics of AX combat, such as exerting and taking hearts, as well as Thargoid shields, skip this section.
¶ Exerting and Heart-Sniping
Thargoids are not like regular ships, their hull can regenerate. This regeneration means that shooting it mindlessly will not result in it dying. Therefore, to kill a Thargoid, we must remove all its hearts; a Basilisk has Five Hearts.
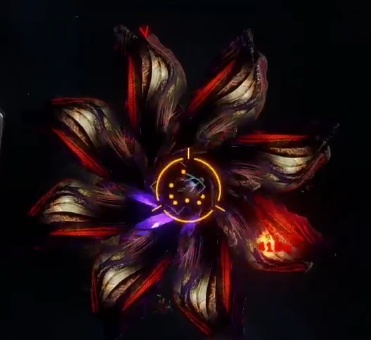
To destroy a heart it must first become ”exerted”, which is done by damaging the Basilisk’s hull. The exerted heart will glow red as shown below. Once exerted, the heart can be shot and destroyed. To kill a Basilisk, all five of its
hearts must be destroyed.
¶ Thargoid Shields
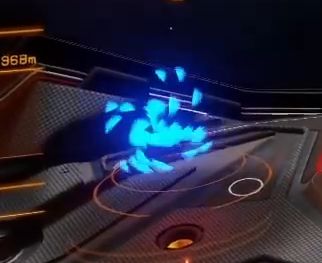
Unlike regular shields, Thargoid shields do not regenerate. A Thargoid throws up a full shield after a heart is destroyed (as long as it is not in the sleep phase. There are both audio and visual cues that can be noticed, however the easiest way to tell if a shield is up is by looking at the bottom left of your HUD, where the targeted ship appears, and looking for the ”Shield Flare” or “Blue Dots” (seen below) that appears when you shoot the Thargoid . Shields must be destroyed before further hearts can be exerted, but modshards are excellent shield removal weapons too.
¶ How to Stunlock
A basic stun-lock can be broken down into three rules that must be followed. This guide will also explain WHY
these rules are in place, but if you learn one thing from this section, learn this:
- Always stay outside of 700 meters of the Thargoid
- Activate ”Silent Running” after you destroy the second heart
- Always have 4 pips to weapons and use at least 2 heat sinks when shooting (even when using Silent Running).
Now onto the why. Stun-locking makes use of the sleep phase that comes after destroying any heart beyond heart one (Hearts will be referred to as H1, H2, H3… from now on). A Thargoid in sleep phase will not try to move and will not fire back, allowing the shield to be quickly stripped and a heart (or even two!) to be taken.
A Basilisk sleeps for 33 seconds starting from when the shield is damageable, which is plenty of time to break it and take at least one heart. If a heart has been destroyed during a sleep phase, the Thargoid won’t wake up and will instead
deploy another shield and stay asleep; this is the principle of stun-locking.
Maintaining the sleep phase requires the Thargoid to not detect you. It can ”see” you at any point you are above 20% heat between 3 km and 700 m, or at any heat if you get closer than 700 m. If it ”sees” you, it wakes up. We cannot use sinks to stay below 20% heat while shooting so we instead use silent running, which makes our heat signature appear as 0% to the Basilisk. This is why we use Silent Running and stay farther than 700 m.
The heat sinks are used, not just for cooling, but to provide distributor charge for your weapons capacity, so two sinks are needed even in silent running for stun-locking.
Finally, destroying the first heart will trigger a lightning phase instead of a sleep phase. You want it to hit you with lightning. As soon as the Interceptor turns yellow (ideally before you get zapped) start shooting the shield.
The lightning phase is shorter than a normal sleep phase so you have to be faster now than you would be for H3 onwards.
Please note that the lightning has a chance to disable your thrusters for a few seconds, do not panic and keep shooting the Thargoid until it exerts. Once your thrusters re-activate, take the heart as normal.
Click here for a sample beginner stun-lock performed by CMDR BadgerNoah. It’s highly recommend giving this a watch if you still have questions.
¶ Common Mistakes
The three most common reasons for beginner stun-lockers to lose runs are: Not taking heart 1 or heart 2 fast enough, causing a panic shield, and drifting too close to the Thargoid.
The first is caused by the Thargoid moving erratically during the start of the fight, the easiest fix for which is to start outside of mass-lock, however this can slow down profit per hour. Avoiding mass-lock is a good starting point but should be phased out with time. After some practice you can take heart 1 faster and then stick with the Thargoid so it can lightning you faster, which helps ensure heart 2 dies quick enough.
The fix to the second issue, panic shielding, is to never attack the Thargoid while the heart is exerted, or right
after one has been destroyed. If you wish to empty your clips, do so into space and not into the Basilisk. The final
issue is fixed by paying attention to the range between you and the Thargoid at all times, which also comes with practice.
¶ Advanced stun-locking techniques
Please wait until you are consistently getting Basilisk kills before reading this section.
¶ Double-hearting and the NEI
By now, you may have noticed that you can take more than one heart per sleep phase, most easily H4 and H5 in one shield. This is called double-hearting. Double-hearting speeds up kills dramatically and learning it is the first step to becoming a top-notch speedrunner and stun-locker. The first step to double-hearting consistently is to understand the Non-Exert Interval, or NEI, for short.
The NEI is a ten-second after a heart has been destroyed where no matter how much damage is done, another heart cannot be exerted. Beginners will often cause a panic shield by shooting the Basilisk excessively during this time.
To land double hearts consistently count to ten after a heart is destroyed before shooting again, and while you’re counting make sure to empty your clips so you have a full five shots when the NEI is over.
¶ Lightning Skip
On a fundamental level, lightning skip is just a much harder double-heart. If heart two is destroyed before the lightning phase is started, the Basilisk enters sleep and does not attempt to zap you. The time window to make this happen is tight, giving only a few seconds of error between first shot hitting the Basilisk and H2 being destroyed.
When this trick is pulled off you must enter silent running after H2 as normal. A good way to count the 10 second NEI is to destroy the heart and empty your clips, wait until the guns are shown to have reloaded, and then count to four. Between the five-second reload, the time taken to empty the clips, and the four second count, this is a good approximation of the 10 second NEI that many people find reduces error.
Lightning skipping is very intricate and even the best stun-lockers cannot do it 100% of the time; there is a reason double-hearts like this are sometimes called ”Impossible Shots”. With this in mind, an optimal sub-70-second Basilisk speedrun consists of a lightning skip, double-hearting H3 and H4 together, and then destroying H5 and finishing off the Basilisk in two shields total. Click here for a sub 70 second speedrun example.
¶ Stun-Locking Medusas
Medusa stun-locks are much the same in theory, with a few major differences. The first is that there is much less room for error on the first heart-snipe, and it is common to need more than one full clip to get the exert and take the heart, making lightning skip excessively more difficult.
The second difference is that the medusa has an extra heart and larger shields, which means your stun-lock ship of choice will begin to struggle and your shards will likely malfunction or burn-off entirely.
The final difference between Medusas and Basilisks is that a Medusa sleep phase is four seconds shorter.
These factors result in Medusa speedruns being RNG dependent as missile damage and heat damage can reduce your own shard damage output too quickly, resulting in a failed attempt. Even the best stun-lockers say they are only around 90% consistent with Medusa speedruns.
This, along with the almost double fight length, is why we do not favour farming Medusas. A typical Medusa speedrun will be around 2 mins and 10-20 seconds (although it can be faster with practice), whereas an optimised Basilisk speedrun rarely takes longer than 70 seconds.
The most advanced farmers, will only pivot to looping Medusa signal sources if both Sterope II and Asterope run out of Basilisk signal sources. While this provides a lower theoretical payout per hour, it helps reduce downtime and makes the upper figure of 450 mill/hr much more consistently achievable.
Acknowledgements
I love AX and both speedrunning and stun-locking got me into it, if you enjoy this gameplay loop I implore you to seek other forms of AX combat and give it a try.
I would like to thank CMDRs 7652 and Nimogrea for teaching me and getting me into stun-locking. Several people helped proof read this document and I would like to thank CMDRs Ivarya, HaellowGrig, AlexMG1, and Edwardga1108 especially for doing so.
A special thanks to CMDR Aranionros Stormrage for his huge contribution to the spelling and grammar. Also obligatory shout-out to CMDR D0van for being a total bloke.– CMDR Jabba66